



Every few months the filter argument flares up again on the photography forums, usually kicked off by someone posting a picture of their shattered UV filter with a caption about how it saved their lens. The thread fills up. Half the people swear by protective filters, the other half think the first half are throwing money away. It’s one of those debates that never actually resolves, and I’ve watched it play out enough times to have landed pretty firmly on one side.
Here’s where I land. For most people shooting digital, the UV filter is the one on this list you can skip, and the other three earn their spot in the bag. Two of them do things you cannot fix afterward in Lightroom no matter how good you are. So I want to go through all four in the order that actually matters, which is not the order the store rings them up in.
Why The UV Filter Stopped Mattering
UV filters made real sense in the film days, and it’s worth understanding why, because the reason they mattered is the same reason they don’t anymore. Film was sensitive to ultraviolet light your eye can’t see, and on a bright day up at altitude or out near water where UV is strong, that sensitivity showed up as a blue haze washing over the image, so a UV filter that cut it was a genuinely useful piece of glass back then.
Digital sensors just aren’t sensitive to UV the same way. So the haze problem the filter was invented to solve mostly went away, and if you put one on a modern camera the image basically doesn’t change. Which is why the whole justification quietly shifted over to protection, and that’s where it gets heated.
The argument goes that the filter shields your expensive front element from scratches and drops. And I’ll give you the scratch-and-dust half, honestly, because it’s fair. Shooting on a dusty track or near sea spray, a cheap filter you can wipe down or replace does spare the actual lens some grief, and I know careful shooters who keep a clear one on for exactly that reason. No argument there.
The drop-protection half is where it falls apart, and the useful thing is that somebody actually tested it instead of just arguing. Steve Perry over at Backcountry Gallery built a little rig, bought a pile of cheap lenses and filters, and dropped weights on them. What he found was consistent: the filters shattered at impacts the bare front elements walked away from. His read on it was blunt, and it stuck with me. Most people who broke a UV filter, he figured, just broke a filter. If the hit was hard enough to actually crack the lens, that thin filter was never going to be the thing that saved it.
And this isn’t only one guy with a homemade rig. When a writer went and put the question to the manufacturers directly, the answers lined up with the tests. Zeiss said their filters exist to solve optical problems, not impact ones. Gobe, which does lean on a protection angle in its marketing, still admitted plainly that its UV filters don’t make a lens breakproof. When the companies selling you the protection won’t themselves claim it stops a drop, that tells you most of what you need to know. The front element is thicker, curved, coated, and locked into the barrel, and it’s tougher than people give it credit for.
The Polarizer Earns Its Keep Because Software Can’t Fake It
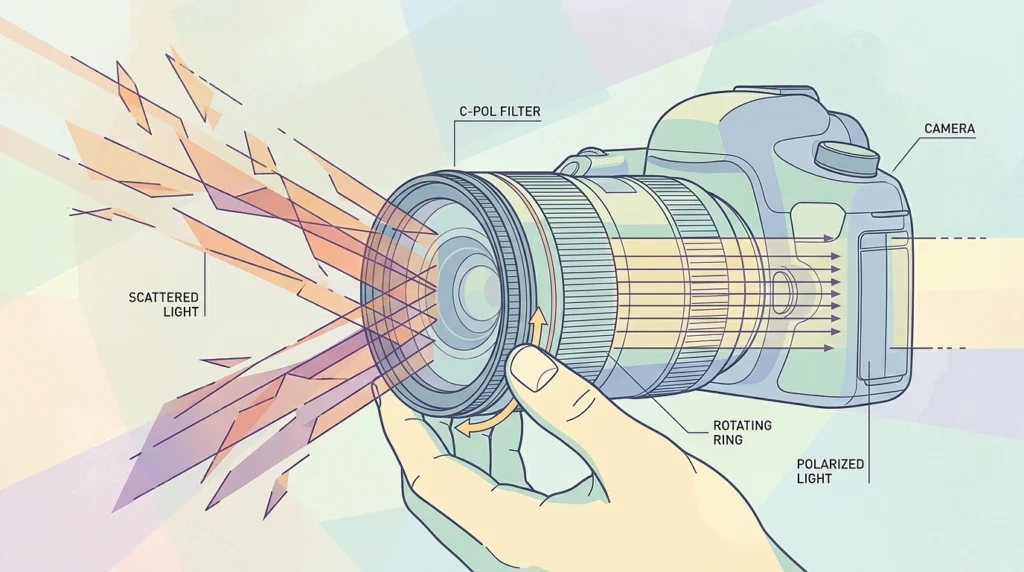
This is the one I don’t leave the house without, and the reason is simple. It does something you cannot reproduce on the computer later.
That’s the part people don’t believe until they see two frames side by side. You can push saturation in editing all day long. What you cannot do, in any software that exists, is pull a reflection off water or glass that the sensor already recorded. Once that glare is in the file, it’s in the file. A polarizer handles it at the moment of capture, cutting the polarized light before it ever reaches the sensor, and there’s no post-processing equivalent because the information was never captured in the first place. Photography Life, which teaches this stuff carefully, makes the same point flatly: the polarizer effect is impossible to simulate in software.
The way it works in practice is that you rotate the front ring and watch the effect come and go, and a few different things happen as you turn it:
Reflections lift off water, so you can actually see into a river or a rock pool instead of a sheet of glare.
Glare drops off windows, car paint, wet leaves, the surfaces that otherwise blow out to white.
The sky deepens to a richer blue, which makes the clouds pop out instead of sitting flat against it.
Everything gains a bit of saturation and contrast outdoors, greens especially, because you’ve stripped off that fine film of reflected light dulling the scene.
You turn it, you stop where it looks right, done. That direct physical control is the whole appeal, and it’s why it lives on my lens far more than any other filter.
One honest caveat, because it’s not a leave-it-on-forever filter. Sometimes the reflection is the shot. Mountains mirrored in a still lake, that reflection is the entire photograph, and a polarizer will strip out the exact thing you drove there for. So it comes off. You reach for it on purpose, not by default. And on a really wide lens you have to watch the sky, because a polarizer’s effect is strongest ninety degrees from the sun, so a wide frame can catch a patch of deep blue on one side and washed-out blue on the other, an uneven band that looks worse than if you’d never bothered.
What An ND Filter Actually Buys You
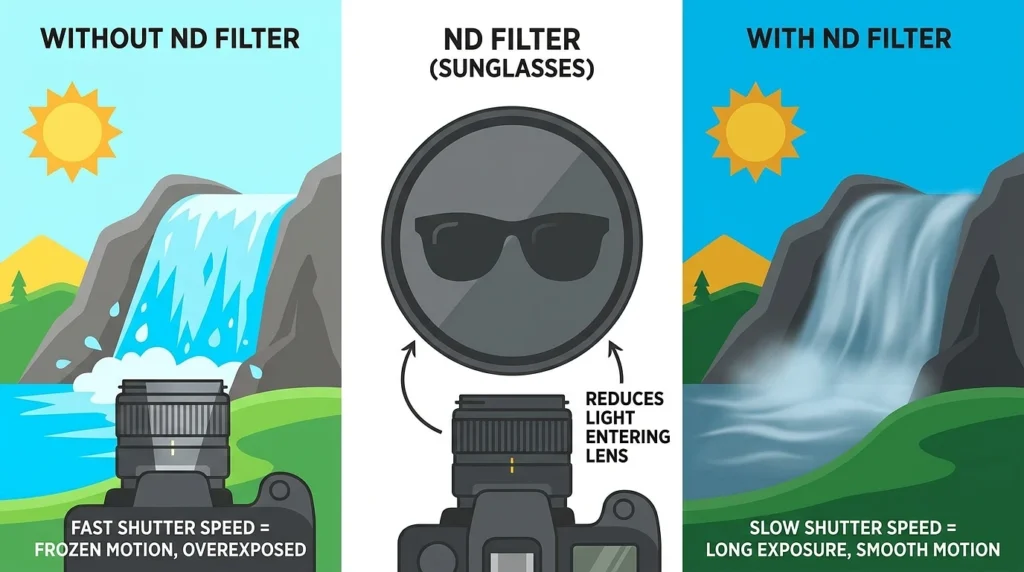
The neutral density filter is the one behind those silky waterfall and seascape shots, the water gone to mist, the clouds smeared across the sky in a long streak. People assume that’s a post-processing trick. It isn’t. It’s this filter.
An ND is just a piece of dark, neutral glass, and neutral is the word doing the work. It cuts the light coming in without shifting the color, sunglasses for your camera, basically. And the reason you’d want less light is a little counterintuitive until it clicks: less light forces a longer shutter speed to reach a correct exposure, and that long shutter is what turns moving water and clouds into that smooth flow. In bright daylight you simply can’t hold the shutter open that long, the frame would blow out to white. The ND is what makes the long exposure possible when the sun won’t let you.
There’s a second use that gets forgotten. Say you’re shooting a fast prime wide open at f/1.4 in daylight for that shallow creamy background. The sheer amount of light can max out your shutter and overexpose the shot before you even get there. An ND pulls the whole exposure down so you can keep that wide aperture. And a blown highlight like that is gone for good, you can’t recover pure white in editing, so the filter is doing real work the file can’t do on its own.
One warning on the cheaper variable NDs, since they’re what most people buy first. The variable kind works by rotating two polarizers against each other, and if you crank it too far toward maximum darkness, you get that ugly dark X smeared across the frame, the bowtie, and on a wide lens it shows up long before you hit the strong end of the dial. Back it off, or spend for a proper fixed ND, if you’re seeing it.
And the other fair warning, unlike the polarizer caveat this one’s not really optional: a long exposure means the camera can’t move at all, so you’re on a tripod. There’s no handholding a two-second exposure into something sharp. If you’re buying an ND, plan on a decent tripod in the same breath, otherwise all the filter gives you is a very deliberate blur across the entire frame. Worth getting your filters from somewhere that actually knows the gear too, rather than grabbing the cheapest disc in the bin, because it’s going straight onto the front of glass you paid real money for.
A Couple Of Practical Things Before You Buy
Two questions come up constantly and neither needs a sermon.
Screw-on or square. Screw-on filters thread right onto the lens, cheaper, more secure, easier to carry, and for most people that’s the sensible pick. Square systems drop into a holder and give you more flexibility, especially for graduated NDs where you want to slide the dark band up and down to sit on the horizon. The tradeoff is they’re fiddlier, and I’ve lost count of the times a square holder has worked loose and clattered off the front of the camera at the worst possible moment. Stick to screw-on with a step-up ring and you’re fine, though stack too many and you’ll start seeing the filter rims creep into the corners of a wide shot.
Glass or resin, cheap or good. Glass is more durable and holds sharpness better, where resin scratches more easily and those scratches can show up as soft marks in the image. And the point underneath all of it is just, don’t put a bargain-bin filter on a good lens. You bought that lens for its glass. A cheap filter is a worse piece of glass sitting right in front of it, adding color casts and softness and quietly undoing part of what you paid for. If it’s going on a lens you care about, spend for a decent one or leave it off.
So that’s the real order of things. The polarizer and the ND are creative pic that widen what you can capture in the first place, and you can’t fake either one after the fact. The UV filter is mostly a habit left over from film that hangs on because the shop keeps ringing it up with every lens. Buy the two that earn it, spend an afternoon learning to rotate a polarizer, and stop worrying so much about the bare front of your lens.